|
Updated October 10th 2003
This tutorial will walk you through the necessary steps
to add a new weapon into Battlefield: 1942 (BF: 1942). You will learn
how to setup a new weapon, configure the animations, add a new weapon
model and place it in-game. The tutorial will show how to add a new M16
into the game based on the existing Sg44 machine gun which is already
in BF: 1942.
PREPARATION:
This tutorial assumes that you already have a new 3d
weapon model to introduce into the game and that your install directory
is \Program Files\EA Games\Battlefield1942\. You will need to use RFAExtractor.exe
to extract the following files from \Mods\bf1942\archives\: objects.rfa,
animations.rfa, standardMesh.rfa and Texture.rfa. Extract these
files into the base install directory for ease of use. All file editing
should be done with a text editor (Notepad, Wordpad, etc.)
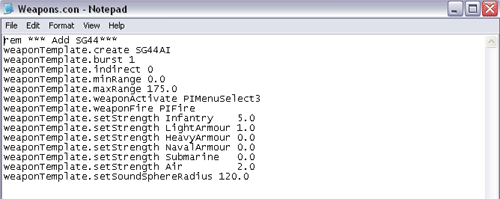
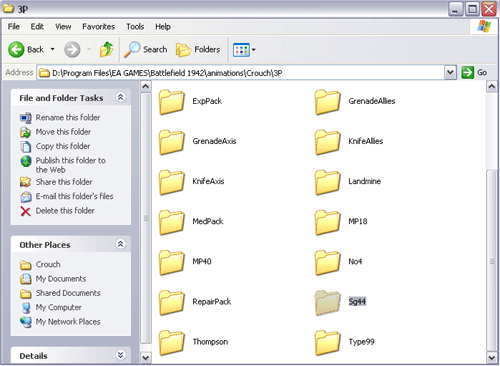
STEP 1: Objects.con Scripting Changes
- Start in the “objects\HandWeapons” directory.
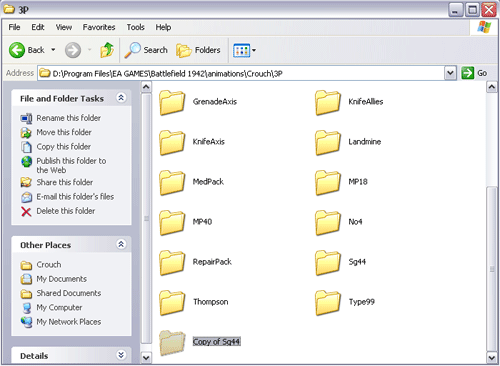
- Copy the “Sg44” directory.
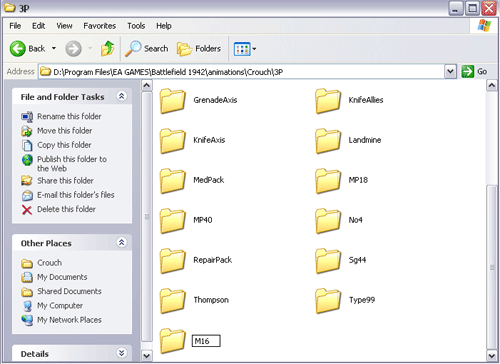
Rename the new directory M16 and enter it. There
will be three files (geometries.con, objects.con and weapons.con)
and two subdirectories (AI and Sounds) within the M16 directory.
The objects.con file is the most important file for a weapon. The file
houses every setting for a weapon, from the rate of fire to how much deviation
that projectile will have once fired.
- Open the objects.con file.

The first line in this file is ObjectTemplate.create
HandFireArms Sg44. This is the most important line in the creation of
a weapon. The name of the weapon set is a reference for everything associated
with it. The new weapon name must be EXACTLY the same throughout all of
your changes throughout this tutorial.
- Change every instance of Sg44 that you find in
this file to M16 with the exception of line 59, ObjectTemplate.addTemplate
e_MuzzSG44.
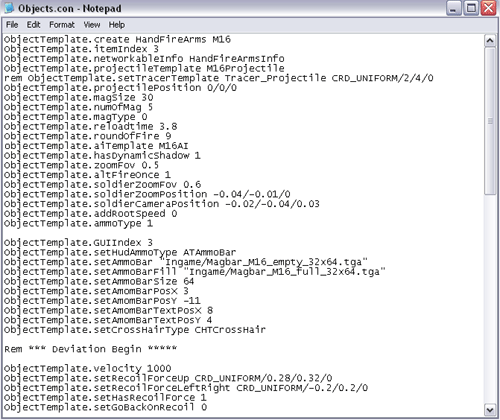
Leave this line alone because it has nothing to do
with the actual configuration of the weapon, but instead tells the game
to show a muzzle-flash called e_MuzzSG44 (an effect) every time the
gun is fired. Also, note line 2. The itemIndex setting is the way that
BF: 1942 segregates its weapons. By default, knives are set as 1, pistols
are set as 2, and machine guns and rifles are set as 3. You can set
your weapon to whatever itemIndex you want, but each soldier can carry
only one weapon from each itemIndex at a time. This means that a soldier
can only carry one weapon set to itemIndex 3 at a time.
- Close and save this file.
STEP 2: Geometries.con Scripting Changes
The geometries.con file tells the game engine where
to find your new 3d weapon model and how it will look from a distance.
- Open the geometries.con file.
- In each line that begins with GeometryTemplate.create,
change the Sg44 to M16.
Once this has been completed, lines that have items
like Sg44Trigger should appear as M16Trigger and so on.
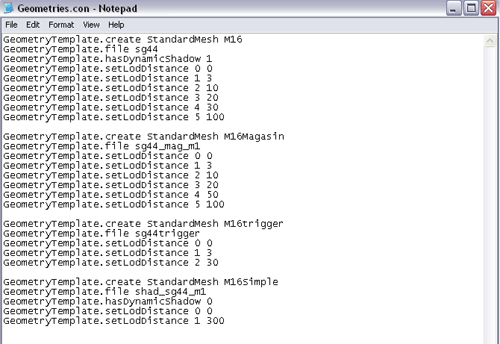
The next step is to modify the lines that start with
GeometryTemplate.file. These lines tell the game engine where the model
file is located. We will assume that you put them in the standardMesh
directory with the rest of the BF:1942 files and that you have three model
files: M16 (main model of gun), M16_mag (gun magazine), and M16Simple
(low-polygon model of the M16).
- On line 2, replace sg44 with M16.
- On line 12, replace sg44_mag_m1 with M16_mag.
- On line 27 replace shad_sg44_m1 with M16Simple.
Notice that we are leaving line 21, sg44trigger,
alone. This is because we will continue to use the sg44trigger model.
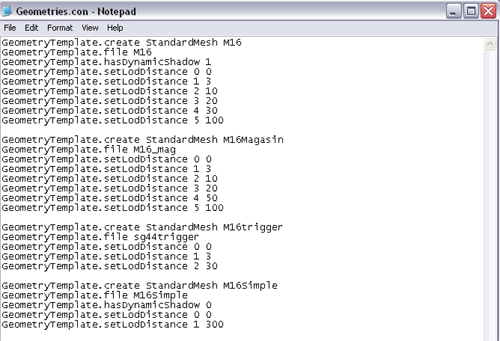
- Close and save this file.
STEP 3: Finishing up
Scripting in the M16 Directory When adding a new
weapon, always setup the artificial intelligence so that the computer
will know how to use your new weapon. This will allow your weapon to be
used in Co-op games. All artificial intelligence for weapons is contained
in the AI subdirectory of each weapons main folder.
- Enter the AI directory.
- Open the Weapons.con file.
- In line 2, change the SG44AI to M16AI.
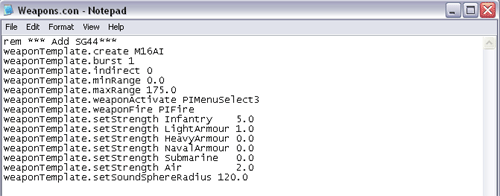
- Close and save this file.
**NOTE: Remember when you made those initial changes
in the objects.con file? You changed line 12 in objects.con to M16AI.That
particular line calls the artificial intelligence settings in the file
you just edited.
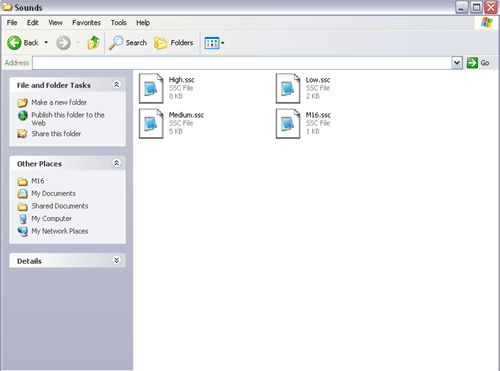
The next step is to make sure that your new weapon
has sound effects. All sound effect settings are contained in the Sounds
subdirectory of each weapons main folder. BF: 1942 has three different
settings for sound. You can choose 11 khz (Low), 22 khz (Medium) or 44
khz (High). There are 4 files in the Sounds directory; Low.ssc, Medium.ssc,
High.ssc and sg44.ssc. The sg44.ssc file is a text file and is the central
sound file that includes all the settings from other three sound files
for the Sg44 weapon. We will base the new weapons sound effects on the
existing Sg44 sound effects for now.
- Enter the Sounds directory.
- Change the name of the sg44.ssc file to m16.ssc.
- Go back to the Battlefield 1942 directory (base
install directory).
You have now finished setting up all the necessary
scripting for the game engine to see the new weapon that you have added.
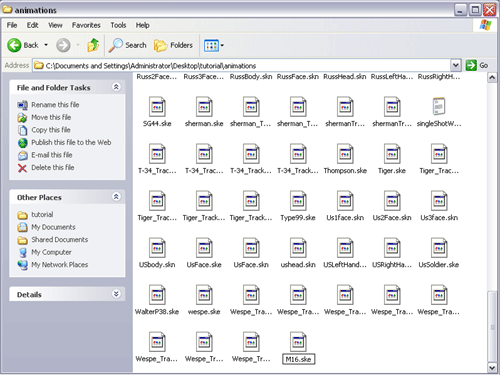
STEP 4: Animations Scripting
The animations directory contains the scripting files,
the animation files and the skeleton file which the game engine uses to
animate every object in BF: 1942.
The SG44.ske file will define how the skeletal structure
of the animations will work in-game (how the arms holding the gun will
move while running, reloading, firing, etc.)
- Enter the animations directory.
- Copy the SG44.ske file
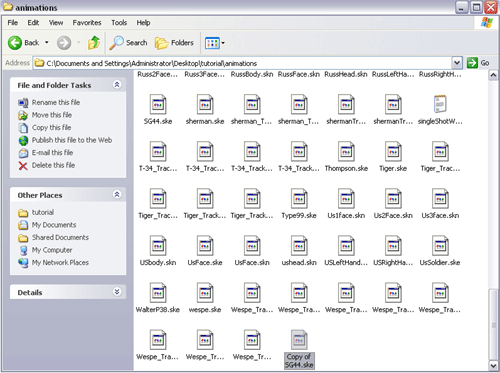
- Rename the new file to M16.ske.
The BF: 1942 engine has built-in support for adding
new weapons. This support allows you to put your additions and changes
into new files instead of modifying and potentially ruining the existing
game files. Instead of requiring you to edit the original files, the BF:
1942 engine allows you to make the following new files as additions: (singleShotWeaponsmod.inc,
multiShotWeaponsmod.inc, and AnimationStatesmod.con).
**NOTE: The game engine will only recognize these three
new filenames.
Because this weapon we are adding is a machine gun,
we will use the multiShotWeaponsmod.inc file and not the singleShotWeaponsmod.inc
file.
- Create a new text file called multiShotWeaponsmod.inc.
- Open multiShotWeaponsmod.inc.
- Add the following line: AnimationStateMachine.copyState2
M16 v_arg1.
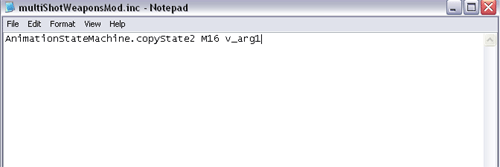
- Close and save this file.
This line tells the BF: 1942 engine that a weapon named
M16 has animations.
The next step will take a few minutes because you need
to gather lines of text that tweak the animations and how the camera will
shake for this weapon.
- Create a text file named AnimationStatesMod.con.
- Open this file.
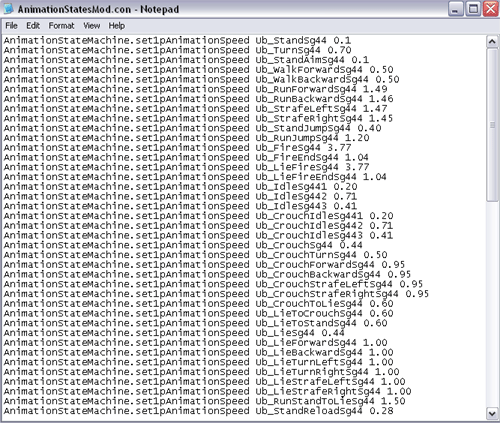
- Copy every line that has Sg44 in it from the following
files: 1pAnimationsTweaking.con, 3pAnimationsTweaking.con, MiscAnimationsTweaking.con.
The lines that you are copying are speed adjustments
to the default speed of the animations that the M16 will use. For example,
by changing these values you change the speed at which the reload animation
will occur. Paste the copied lines into the AnimationStatesMod.con file
you just created.
- Open the AnimationStatesCameraShakes.con and search
for Sg44.
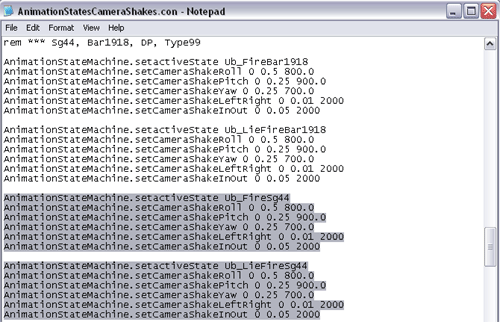
This particular file contains settings which define
how the camera will shake when particular weapon is fired. There will
be two lines with Sg44 in them, but you need the 5 lines under each
of those instances (for a total of 12 lines in this file).
- Copy the 12 lines of text into the new file AnimationStatesMod.con.
- Replace every Sg44 with M16 in the AnimationStatusMod.con
file.
**NOTE: This can be done easily with a text editors
find/replace function.
- Close the AnimationStatesMod.con file.
STEP 5: Animation Files
Having finished the animation scripting, the next item
to complete is the setup of the animation files that the game will use
to bring the new weapon to life. This task entails copying directories
and renaming files. The animation files are split up into different directories.
Each directory name denotes the type of animations that are held inside.
**NOTE: In this tutorial we will work with the existing
SG44 animations. You are able to make new animations for your weapon
using the Mod Development Animation Tool.
There are five main directories that you will need
to work on: Crouch, Lie, StandWalkRun, WeaponHandling, and Weapons.
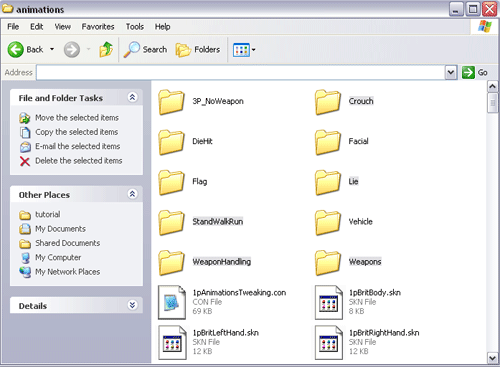
Four of these directories (all except the Weapons
directory) have a subdirectory named 3P (only the StandWalkRun and
WeaponHandling directories have both the 1P and 3P subdirectories).
Follow these steps for each main directory:
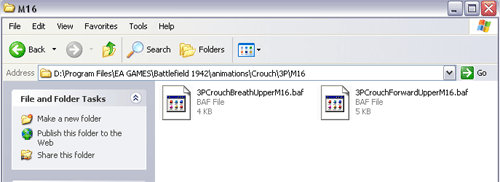
- Find the Sg44 directory.
- Copy the Sg44 directory.
- Rename the new file to M16and enter the new directory.
- Replace the Sg44 in each filename with M16 (ex.
3PCrouchBreathUpperSg44.baf would be changed to 3PCrouchBreathUpperM16.baf).
Follow the steps above for each of the main directories
(Crouch, Lie, etc). Once these steps have been completed, you have
created all the files necessary to animate your new weapon.
- Go back to the Battlefield 1942 directory (base
install directory).
STEP 6: Adding the New Weapon to a Kit
The weapons in BF: 1942 are added into the game via
kits. Each kit defines the weapons with which a particular class of soldier
will start the game.
- Enter the objects\Items directory.
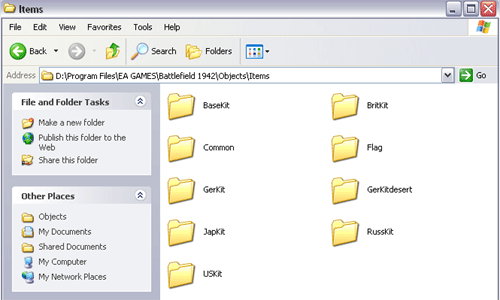
You will see a list of directories. These directory
names are made up of the country they represent and the word kit. Pick
the country (directory) to which the new weapon will be added. We will
use USKit for this example.
- Enter the USKit directory.
There is another set of directories named for each
class of soldier. We will add the new M16 to the Assault class.
- Enter the Assault directory.
- Open the objects.con file.
- Find the line that has Bar1918 in it (the main
machine gun for the US Assault class).
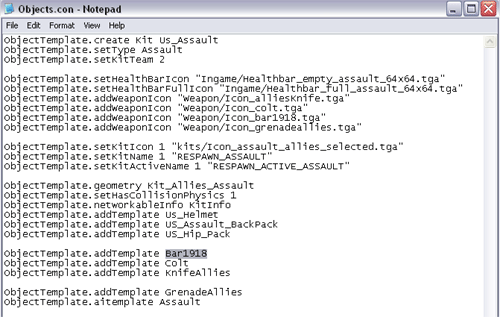
- Replace Bar1918 with M16.
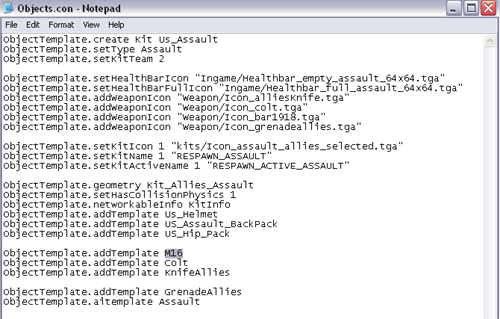
You have now added a new weapon into BF: 1942. Once
you put the objects, animations and standardMesh directories back
into .rfa format, you can start BF: 1942 and test out the new weapon.
|